Showing posts with label scrap project. Show all posts

Saturday, February 17, 2024

Scrappy Heart Crush: How to Use a Paper Template/Pattern


Scrappy Heart Crush: How to Use a Paper Template/Pattern

In the past blog post, Free Pattern: Scrappy Heart Crush, I showed how to make the paper template above. Today I'll show you how to use it, and add a few cutting and trimming details to the template.

Years ago quilters were used to making a lot of their own paper templates, or improvising to recreate a pattern. We aren't as comfortable drawing up our own patterns anymore, and rely on purchased patterns where all measurements are laid out. EQ8 is a big help, but often a pencil and paper is more than adequate. Most people are very capable at creating their own patterns. I encourage you to try it because it's such a confidence builder, and gives you options when you see something you'd rather not spend a lot of cash on. 


Start by folding the pattern on the lines. Just make a crease forward or backward. You will need to fold the segments to check your seam allowances, and trim the block. 


Lay out all your pieces or scraps for a general idea of how they go together. The pattern is marked with information on pieces that need to be cut precisely with a ruler.


Cut 2 pieces of fabric to use for top of heart according to pattern. Use a 2" square of background fabric, draw a diagonal line on background fabric. Position as shown. Sew on line, press to back of block, and trim. Do both pieces and sew together matching at background "V".


Cut a triangle of background fabric according to template. Fold the triangle of background fabric in half to find the midpoint of long edge. Match to center seam and sew together. The triangles on all corners are cut oversized to allow you to trim precisely when the block is complete.


Cut 4 strips according to the measurements on the template. (I did not cut mine to length in the photo. Sorry. The measurements given are the minimum lengths needed.) Fold in half to find the centers then eyeball down from center seam and sew.


Lay the paper template on top of the right side of the block matching template lines to seams. If the seams are not quite accurate, it's okay. This is a very forgiving block. Using a square ruler on top of the template, trim the lower portion of the block. You have not yet added the bottom triangle.


Use the same method to the top of the block and trim.


Fold the side corners back on the solid line making sure you add your 1/4" seam allowance. Trim.


Your block should look like this now. 


Cut a bottom triangle according to the pattern measurement or use the template to help you cut one from a piece of scrap fabric. Notice how I cut mine oversized here. Sew.


Add your side triangles, and then trim all corners with the ruler to a precise 10 1/2". Done. What a cute block, and it's great for using up all colors of strings! Reach out to me with any questions you might have.

Next post is how to do the LOVE block. Can't wait to see you back here in a few days.

Come on, Doxie girls. 
Let's go sew. 


Wednesday, February 14, 2024

Free Pattern: Scrappy Heart Crush


Happy Valentine's Day 2024!

February rolled around sooner than expected yet it's the same time every year. It's funny how that happens. I don't decorate much, if at all, for minor holidays, but it's nice to have a throw to bring out to lay across the couch back. Also, red is especially nice as a pop of color during the drab months of winter!

I added two outer borders this morning to finish this off, and I like how it ties the colors together. 

Sunday, January 21, 2024

Glitter Top Done


Glitter Top Done

What a relief to finish this top last week! Okay, I may have been a little sad to see it end, but only for a moment. I've never done any quilt with so many of the same block, and likely won't again for a long while.

Saturday, January 6, 2024

Glitter Blocks Week 6: All Done


Glitter Blocks Week 6: All Done

Did you ever think I'd get this done ahead of schedule? I did not, and I'm surprised. It leads me to two possible conclusions: the vacation with bad weather or having a schedule laid out ahead of time--or maybe both. Either way they are done, and I've laid out all 162 to make sure they work.

The shocker when they were laid out was I wound up with close to the same number of light and dark backgrounds without planning. It wasn't a juggle to lay them out, and even if it wasn't a definite light or dark it was fine using value as a guide.

I'm hoping to get these together this morning, and just maybe while the snow starts falling this afternoon I will load it on the longarm. We are due 2" in the next 24 hours, and while it's not a lot life will slow down here. My goal is to have it bound by Tuesday for a show and tell Wednesday. It's good to have a plan, right?

Hope your home is warm and tight as we all buckle down for winter here in the U.S. I think it's finally coming.

Come on, Doxie girls.
Let's go sew.


Thursday, December 14, 2023

Glitter Progress Week 3


Glitter Progress Week 3: 83 Blocks and Counting

I had so much help taking a photo today, but the light was great! How's that for a week's work? I went from 56 to 83, and that's averaging slightly higher than my 25 block a week goal! Honestly it was a lot of sewing, and I'm not sure I'll hit that every week, but I'm about halfway now. 

Tuesday, November 28, 2023

Glitter Progress and an Organizational Work Plan


Glitter Quilt Progress and Plan

Ooooh, I like this quilt, and so far so good! This is a fun project to get me actively into my scrap bins, and I love how it allows me to mix those fabrics in novel ways. Our scraps are an amalgamation of everything we've created whether modern, vintage, or traditional, and mine reflect that diverse work. These blocks do too. We can get stuck with thinking a certain fabric can only go with other fabrics in the same line, or ones we've used them with before. It's hard to shake off what goes together. It's like when you wear an outfit. Those jeans go with that shirt and these shoes. This is shaking it all up for me.

Some of the vintage feeling fabrics are truly old, and others are remakes. Some are old shirts. A few were definitely the last bits of favorite prints that I even pieced the very end parts together to get one last square. I'm loving the using-it-up mentality in this work!

Monday, November 20, 2023

Glitter Blocks Machine Sewn


Glitter Blocks Machine Sewn

For months I've looked for a good project that would hold my interest, and I think I've found one. It's Glitter by Jen Kingwell, with the pattern found in Quilt Lovely. Years ago I loaned out my copy, and it disappeared unfortunately. I had already made several projects from the book and convinced myself I didn't need it, but this quilt was still nagging me to make it. I had the templates purchased, and though it's a straightforward pattern, I repurchased the book. I really enjoy looking at Kingwell's fabric pairings in the photos, and it feeds me ideas.

Sunday, October 15, 2023

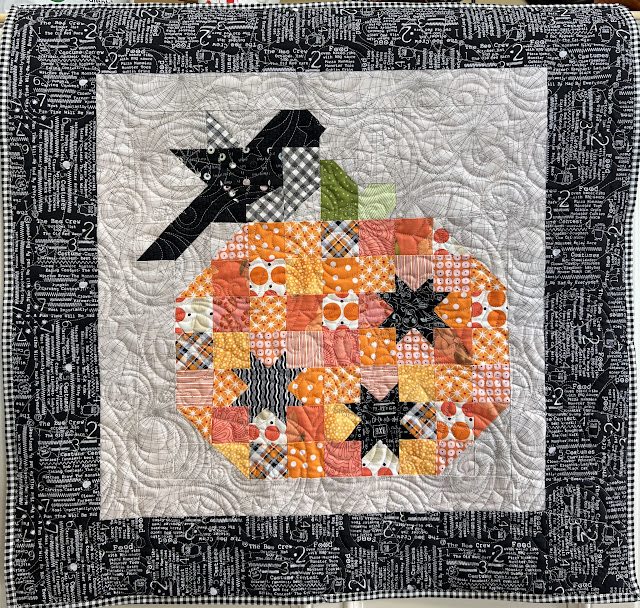
Pumpkin Season


Pumpkin Season

This pattern was purchased some time in the past, and I've wanted to make it, but could never find the time. (I have a lot of patterns in that category!) It's called Pumpkin Season by The Pattern Basket. My mom lives in a small apartment now, and I wanted something quilty to hang on her door for the season. That was a good reason to carve out the time this weekend, and it's entirely ready to hang in just a couple days or so.

I do want to make one comment in defense of the wavy edge look in the photo. The tiny gingham check is causing that visual wave more than anything, though it's curved up over my counter to hold it for the photo. It lays flat when it's on the table, but I may still give it a steam from the backside to make sure it lays very flat before hanging it. Lesson noted and learned using a check fabric for binding. 

Thursday, December 3, 2020

Teapot Cozy: No Math


Teapot Cozy
Keep Your Teapot Warm
No Pattern Needed

Quilters are made to believe they "need a pattern" for the most basic of things, but breaking out of that thinking is incredibly freeing. We don't need a set of numbers or directions for everything we want to do or make. The makers before us drew mainly on their own ingenuity, imagination, and make-do attitude. If you've never done worked with a pattern, I encourage you. There is a satisfying feeling of creating with your own ideas! 

If something doesn't go as planned, it may be reframed as a positive design element instead of a mistake in understanding poorly written pattern instructions. It stimulates your critical thinking, and creates a one-of-a-kind object. Whatever the outcome, it's a feel-good-thing, and we all need that now. Right?

Let's get creative!